Select the closest and furthest enemy, deal damage equal to 100% of attack power and apply [Battle Desire] which lasts 2 turns.
[Battle Desire]: Increase damage received and damage dealt by 10% per stack. After attacking in your turn, Chaos will counter with damage equal to 100% of attack power (this attack can trigger ambushes and counters). Cannot be dispelled.
Luck Ender
Select the highest health enemy and designate an attack zone around them. At the beginning of the next round, deal ranged physical damage equal to 60% of attack power to all enemies within range. If this attack hits less than 3 targets, all units hit will gain [Fear and Decay] for 2 turns. If the number of targets hit is greater than or equal to 4, all units hit will gain [Despair] for 2 turns.
[Fear and Decay]: Reduce movement range by 2 tiles, can be stacked. If this is dispelled, all allies will gain [Piercing claw] for 2 turns.
[Piercing claw]: When dealing physical damage, ignore 5% of the target’s defense per stack and cannot be dispelled.
[Despair]: Increase damage received by 10% per stack. If this is dispelled, all allies gain [Abnormal guidance] for 2 turns.
[Abnormal guidance]: When dealing damage to a target out of cover, increase crit damage by 5% per stack, cannot be dispelled.
Frontal Pressure
Deal damage equal to 80% of attack power to all enemies within a 5 tiles radius around self, at the same time gain 1 layer of [Strong wall clear field]. When the attack hits a target, dispel [Strong wall clear field]. For every 3 targets hit with this skill, gain 1 layer of [Pressure rebound] which lasts 2 turns.
[Strong wall clear field]: Increase defense by 30% per stack, cannot be dispelled.
[Pressure rebound]: Decrease defense by 10% per stack with maximum of 3 stacks, cannot be dispelled.
*Notes: Try to have at least 1 doll near him so he doesn’t gain that [Strong wall clear field] buff, if you don’t have enough sustain try to position the healers and buffer at the front closer to him as usual.
Chaotic Whispers
Deals a fixed amount of damage equal to 10% of the target’s max hp to all enemies within the battlefield and apply [Whispers] which last for 2 turns.
[Whispers]: Increase damage taken by 10% per stack, cannot be dispelled. When [Whispers] is applied, if the holder’s own hp is greater than or equal to 100%, or when their hp is restored to 100% or more, [Whispers] is removed, and they gain [Discard interference] for 2 turns.
[Discard interference]: Attacks ignore 15% of the target’s defense per stack, cannot be dispelled.
Notes: Wording is a bit weird, it just does damage equal to 10% of every doll’s max hp at the moment.
Primitive Life Form
If your hp is below 100% at the start of your turn, gain a [Force field shield], this can only be activated once per battle. If your hp is below 50%, you immediately gain a [Phase shift shield] which can only be activated once per battle.
[Force field shield]: Generate a shield equal to 10% of max hp. When the shield is active, stability damage is reduced by 2 and defense is increased by 50%.
[Phase shift shield]: Generate a shield equal to 15% of max hp. When the shield is active, [Final damage] taken is reduced by 30%.
[Final damage]: The final damage obtained after calculating all the bonuses, such as damage increase and damage reduction.
Notes: Please stop speedrunning the kill on the gunsmoke bosses with your whale team if you have the passive 🙂
Accumulated Resentment
When stability is higher than 0, damage taken is reduced by 80%. After stability is broken, stability cannot be restored. After 2 turns, fully restore stability.
Adaptive Shell
After taking 5 instances of phase damage, gain [Phase passivation] for 2 turns. After taking 5 instances of physical damage, gain [Blunt passivation] for 2 turns.
[Phase passivation]: Reduce phase damage by 10% per stack. If dispelled, self gain [Weakness exposed].
[Blunt passivation]: Reduce physical damage by 10% per stack. If dispelled, self gain [Weakness exposed].
[Weakness exposed]: Damage taken increases by 3% per stack, up to 10 stacks. Cannot be dispelled.
Notes: Make some cleanse units kinda bad (Vector, Robella, Springfield) and some better (mostly Qiongjiu). Offensive cleansers are still worth bringing but try to count your attacks so that he doesn’t gain either one of the buffs or just use a lot of cleanse keys.
Squad Preparation
Run 1 offensive cleanser with really good cleanse numbers (QJ) or 2 cleansers. This boss makes you question your previous offensive cleanse option, but they are still good don’t worry, they will just be a bit less potent.
Teams with a lot of attacks/phase damage instances (water, electric, fire, corrosion) are going to lose a bit of damage, but they are still fine for the most part.
Just be mindful of your attack count so you can get the [Phase passivation] and [Blunt passivation] cleansed.
He hurts quite a bit so try to keep your DPS in the middle and support/sustain units at the back and front near him so you gain more [Pressure rebound] stacks.
There will be 3 boxes spawning in at turn 2 and 5 that will give you a 20% damage boost for 2 turns. Have at least one doll placed behind the boss and 2 dolls to the left and right so you can get maximum damage for this fight.
Just remember to keep 3 dolls/units near the boss for max stacks of [Pressure rebound].
Pay attention to the turn order so you can position your team for the Luck ender skill to get a bit more damage.
Turn order
Don’t be discouraged if you have a lower score than normal, they designed this boss to stop the whales from killing it too early, so it’s a lot tankier than previous seasons.
But he’s a lot simpler, and he also doesn’t have any mechanics that bricks your run like the bear.
Skill I: Abyssal Invitation
Skill II: Luck Ender
Skill IV: Chaotic Whispers
Standard positioning is 4 frontline dolls, 1 backline doll.
Put your DPS at the far left and right to prep them for the boxes spawning. There will be 2 boxes to the far left and right, and one more box that spawn behind the boss to the right (usually).
Going forward, just remember to look under the boss’s health bar to check if he has the [Phase passivation] and [Blunt passivation] buff or not so you can cleanse it.
Also take note that you can get a tiny amount of damage increase if you put 3 dolls/units near the unit designated by the Luck Ender skill, so take advantage of this if you want, it’s not that important so you can just skip this part.
Skill I: Abyssal Invitation
Skill III: Frontal Pressure
Put at least 3 dolls/units near the boss so you can get stacks of [Pressure rebound] and stop him from gaining [Strong wall clear field]. Pick up the boxes before you do damage with your DPS.
Skill I: Abyssal Invitation
Skill II: Luck Ender
Skill IV: Chaotic Whispers
Skill I: Abyssal Invitation
Skill III: Frontal Pressure
Boxes are about to spawn, so remember to have units at the far left and right, and one at the back.
Skill I: Abyssal Invitation
Skill II: Luck Ender
Skill IV: Chaotic Whispers
Skill I: Abyssal Invitation
Skill III: Frontal Pressure
kill I: Abyssal Invitation
Skill II: Luck Ender
Skill IV: Chaotic Whispers
The whispers have faded.
Daily Aid Notes
Full of blood (When your team has full hp or more, ignore 30% of the boss defense)
Springfield’s domain.
That being said, if you have a decent healer or plan to use a guild’s springfield/suomi/centaureissi with a decent amount of investment, you can practically use any team with this aid.
Galloping and gaining momentum (For every 5 tiles moved, gain 5% damage boost per stack, max of 10 stacks)
This can work on every team, but it’s probably only worth using on teams that have dolls with insane mobility and extra turn (Klukai, Qiuhua, Daiyan, Tololo).
Just remember to move them a lot so you actually get the damage boost.
Attack and gain momentum (After each instance of fixed damage that the enemy received, damage dealt by the team will be increased by 2% per stack, max of 15 stacks)
Best in slot teams for this one is electric and fire, so just pick which one you want to do this with.
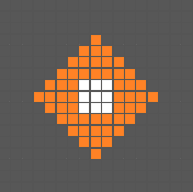
Distance Precision Targeting
Range for both long and short variations is calculated relative to the center tile of the boss, not its whole body.
Example runs
The easiest team to run by far but it’s pretty low ceiling, you just need the QJ cleanse key.
This team is pretty ass, I just use it to showcase a v0 robella. Don’t use dushev here, just use robella + maki combo (can consider suomi but I don’t think she’s that good) and slot in either hydro (spring, tololo, nikketa) or electric (lenna, leva, andoris).
Just like last season, you can choose to run it pure or with either hydro or ice depending on who you have. Pretty solid team if you use the fixed damage aid. Ceia also has a run of this team so check him out if you want.
Random team with Klukai. Klu can be run with either water like usual or electric if you want, it doesn’t really matter as she’s broken. Just make sure to have peritya or enough support attacks to use her ult every turn.