When stability is higher than 0, select the farthest and closest enemy and deal 100% of attack power to them, then apply [Punishment Mark] which lasts for 2 rounds. When stability is at 0, attack mode changes. Deals 100% of attack damage to all enemies within a radius of 5 squares around self. Each time an enemy is hit, apply one [Punishment Mark] which lasts 2 rounds.
[Punishment Mark]: Increases damage taken by 5% and attack power by 5%, can be stacked. After actively attacking during your turn, you will be counterattacked by [Fortress Count].
[Fortress Count]: Deal physical damage equal to 100% of the Deichgraf attack power (which can trigger ambush and counterattack), cannot be dispelled.
Prison Cannon
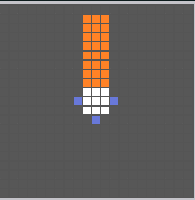
Launch a missile in the direction of the nearest enemy within a 3x8 grid causing 100% of physical damage to all enemies and apply 1 stack of [Artillery Calibration] which lasts for 2 rounds.
If no enemy is detected within the skill range, skip this attack. When the attack hits a [Barrier Chain End] the [Barrier Chain] gains 1 stack of [Recharge] for 2 rounds.
When the attack hits a [Interference Chain], the [Interference Zone] effect on the [Interference Chain End] is removed. When the attack hits a [Detection Chain End], the [Pre-detection] effect on the [Detection Chain End] is removed.
[Artillery Calibration]: Increase damage taken by 10%, stackable. If this is dispelled, gain [Calibration Destruction] for 2 rounds.
[Calibration Destruction]: Increase crit damage by 5%, stackable and cannot be dispelled.
[Recharge]: Increase defense by 50%, stackable and cannot be dispelled.
[Interference Zone]: Reduce aoe damage taken by 90%, cannot be dispelled.
[Pre-detection]: Reduce single target damage by 90%, cannot be dispelled.
Notes: Ways to use this in the fight correctly will be in the video examples and the fight guide section.
Final Mass
Deal 100% of attack power as physical damage to all enemies and apply [Ultimate Imprisonment] which lasts for 2 rounds.
[Ultimate Imprisonment]: Reduce movement by 4 squares, can be stacked. If dispelled, all allies will gain [Freedom] which lasts for 2 rounds.
[Freedom]: Attacks ignore 1% of target’s defense, can be stacked, cannot be dispelled.
Exposed Armor
When the number of debuffs on the boss is equal to or greater than 8, defense will be reduced by 10%.
*notes: Mostly a Lind passive but there are a couple of teams that can use this like hydro and electric.
Prison Fortress
When stability is higher than 0, Damage taken is reduced by 80%. After stability is broken, Deichgraf and the beacons will not recover stability under any circumstances.
Triple Chain Force Field
When the [Barrier Chain End] device exists, establish a link between it and the boss, then give the boss and the remaining devices [Chain barrier]. When the [Barrier Chain End] is destroyed, the link and effect is removed.
When the [Interference Chain End] device exists, establish a link between it and the boss then the device gains [Interference Zone]. When [Interference Chain End] is destroyed, the link and effect is removed.
When the [Detection Chain End] device exists, establish a link between it and the boss then the device gains [Pre-detection]. When the [Detection Chain End] is destroyed, the link effect is removed.
When there is any [Chain End] device on the field, the final damage received is reduced by 80%.
[Chain barrier]: Reduce stability damage taken by 30 points. Cannot be dispelled.
[Interference Zone]: Reduce aoe damage taken by 90%, cannot be dispelled.
[Pre-detection]: Reduce single target damage by 90%, cannot be dispelled.
Beacons
All of them have one passive in common: At the start of The enemy’s turn, target 2 dolls with the highest and lowest hp and deal 50% of the beacon’s attack power as physical damage to all friendly units within a range of 2 squares centered on the 2 target.
Left beacon (Interference Chain End)
Passive: While this unit is alive, give the boss [Chain Interference].
[Chain Interference]: Defence increases by 50%, Aoe damage taken is reduced by 50%, cannot be dispelled.
Middle beacon (Barrier Chain End)
Passive: While this unit is alive give the boss and the other devices [Chain Barrier].
[Chain Barrier]: Reduce stability damage taken by 30 points. Cannot be dispelled.
Right beacon (Detection Chain End)
Passive: While this unit is alive, give the boss [Chain Detection].
[Chain Detection]: Attack damage increases by 50%, single target damage received is reduced by 50%. Cannot be dispelled.
Squad Preparation
Sorry to say but this boss is not auto friendly. Klukai / Lind team is preferred here but it won’t be too bad if you bring a single target damage team like fire (You would lose a bit of scoring compared to the 3 previous bosses though).
NEW UPDATE: Counters and Interception is a viable choice now with the new passive that was added to the beacons in season 2 (Thank fucking god). It probably won’t be as good as klukai turbo, but at least pure ice and hydro can actually do something.
Bring someone that has an AoE cleanse with low cooldown like Centaureissi and Suomi (Update: Florence is also one of the most f2p friendly options if you’re using something like corrosion).
High dupe Springfield is also an option. Low dupe Spring is late to the cleanse unlike Suomi and Centaureissi so you would lose out on the damage if you used her or you have to bring a second cleanser like Colphne.
Unlike the previous bosses you don’t need any offensive dispelling because most of this guy buffs cannot be dispelled and is gained if you position incorrectly so just follow the guide 🙂.
Turn order
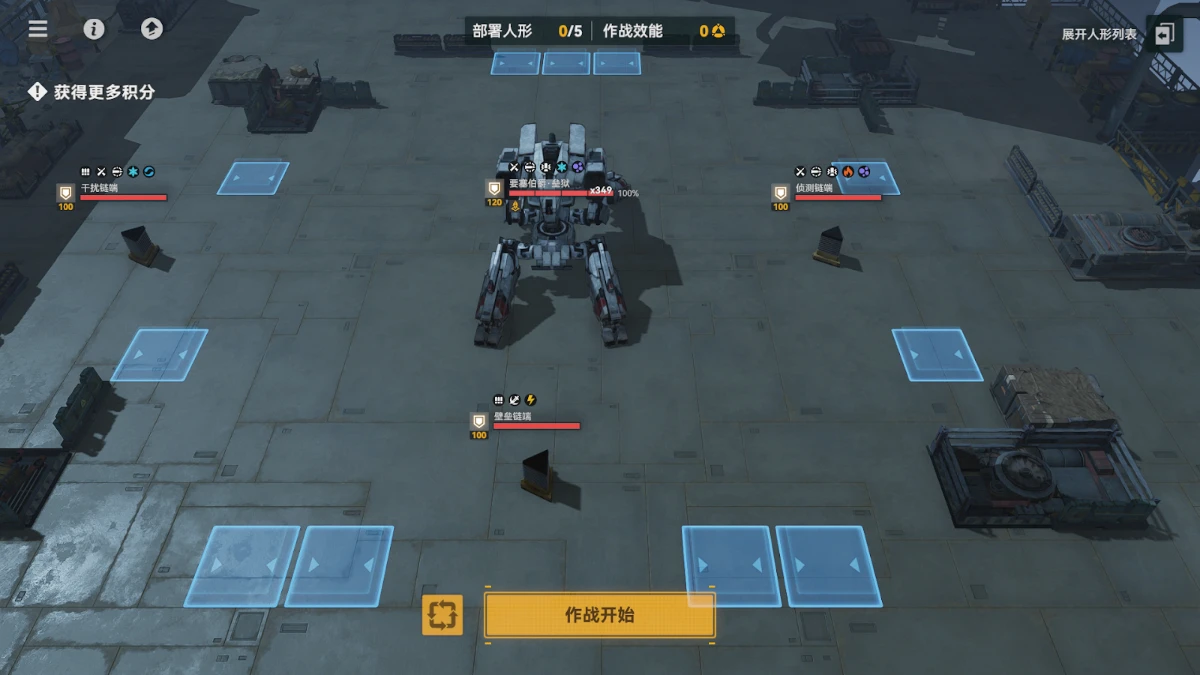
Depending on if you are using an AOE or single target team, you want to place your dps units on the left or right in front of the boss. This is because we want him to use Skill II: Prison Cannon on them for the debuff that gives crit damage when cleansed and also to dispel the beacon damage reduction buff.
If you are a single target damage focused team, what you want to do is to focus on shooting the middle beacon while standing in front of the boss on the right.
If you are an AOE damage focused team then you don’t really need to care about hitting just the middle beacon because you can hit 2 to 3 beacons and the boss at the same time but remember to stand on the left first to cleanse the left beacon’s buff.
If you’re doing a solo carry run like a v6 Klukai/Lind while having single target members like Tololo and QJ, then you’d want to stand on the left to cleanse the left beacons buff to let your hypercarry destroy all 3 beacons at the same time while the rest of the team focus the middle beacon.
The reason we are focusing the middle beacon first is because the middle beacon has no damage reduction buffs and it is giving the other 2 beacons a stability damage reduction so we will have an easier time killing the middle beacon first.
While for the other 2 beacons, you have to wait a turn for them to get cleansed before getting full dps on them. After you’re done with the middle one you can just choose one of the two remaining beacons to kill.
If you don’t have enough cleanse or sustain to keep tanking him then you should just move out of the way but don’t stand in front of the boss near the middle beacon.
If you do that, he will gain a permanent def boost for the rest of the fight that can’t be dispelled.
Other than that this boss is pretty simple, position your dps units in front of him on either left or right to gain the debuff, cleanse the debuffs and shoot the middle beacons. After you’ve destroyed the middle beacon, you can move on to dps either of the beacons but preferably the one that doesn’t have damage reduction against the type of team you chose.
Skill I: Disciplinary Agreement
Skill II: Prison Cannon
Skill III: Final Mass
Place your dps units in front of the boss on the left (AOE) or the right (Single Target), your sustain and tanks can just stand outside of the blast zone because they don’t benefit much from the crit damage buff anyway.
If you’re using a corrosion team, you can place your v6 Klukai on the left and let her use ult on both the middle beacon and the right beacon.
After you’re done with Klukai, move her back in front of the boss with the rest of the team to stack the debuff to get more crit damage. You would also want to station Lind on the left because this will allow her to dps all 3 of the beacons and the boss for more scores.
Skill I: Disciplinary Agreement
Skill II: Prison Cannon
Skill I: Disciplinary Agreement
Skill III: Final Mass
Boxes spawned go get them. You would want to cleanse the debuff at the end of this turn to keep the crit damage buff up for the rest of the fight but if your sustain unit can’t cleanse it this turn it’s fine.
Skill I: Disciplinary Agreement
Skill II: Prison Cannon
Skill I: Disciplinary Agreement
Skill II: Prison Cannon
Skill III: Final Mass
Boxes spawned go get them. Usually around this time you would have blown up the middle beacon already so you should start moving toward either the left or right beacon to dispel their buff with the boss Skill I.
Skill I: Disciplinary Agreement
Skill II: Prison Cannon
Skill I: Disciplinary Agreement
Skill III: Final Mass
You have gained back your freedom.
Daily Aid Notes
AoE attacks deal 10 more stability damage
Kinda mid actually because both the boss and the beacons will never regenerate stability, they also have [Chain Barrier] so they won’t take much stability damage and you’d only want to dps 1 to 2 enemies anyways.
If you have a really invested Klukai team and you just wanna speedrun breaking the enemies stability so you get to dps earlier then it’s fine but if you don’t have that team invested just pick something more generic like extra crit damage if the enemies are in stability break.
When you have 4 or more buffs, you ignore 25% of enemies’ defense
Considering how much defense this guy has, this feels like a godsend.
Example runs
This is a blind run that I bruteforced with Klukai and Leva, it has some of the most broken characters in this game so even though I didn’t read I still got my highest score of this season probably. (Update: I got higher scores by reading 🤓)
Good ol reliable fire with an outdated strategy of standing outside of the boss range and not stacking the crit damage buff. It only did 700 less than last season's score for fire so it’s not that bad but I will have an updated fire team run later. (Update: I changed the strat but the run only got 7 more scores than the strat in this vid so just use whichever strat you like).
More of a v6 Lind solo but you can probably get a good idea of how hydro corrosion works with this.
(Not quite) Optimal corrosion team only run + some bonus ranting about this boss design in the description.