
Mines II level guide
Mine – II is when it starts ramping up in difficulty, and we start to encounter the hardest bosses and enemies in the game. This level follows the same pattern of spawning mini bosses at minutes 3, 6, and 9, each of which one drops a box, however, in Mine – II there are 3 new threats that we need to talk about: L-Crystals, B-Eaters, and Crystal Chamber.

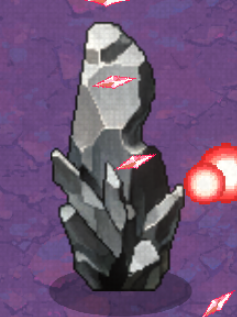
These are enemies that spawn in groups of 3, and after 3 seconds they will explode, launching 3 crystal bullets in a shotgun pattern; these crystal bullets do much more damage than normal bullets.

The main way to counter them is for you to kill them before they can kill themselves; then they will not shoot anything. Most of the time, you will still have to dodge them due to the wrong weapons or timing.
I recommend getting some long-range weapons like Boomerang, Black Hole Bomb, or any of the Evolutions. If you don’t have enough damage to kill them yet, then I would recommend getting at least two Movement speed upgrades to help with dodging.
L-Crystals will start spawning at minute 5 and will continue to spawn for the rest of the level. It would be a good idea to get somewhat comfortable with these guys because they will be popping up again at a harder level.
These are enemies that destroy any bullet or projectile that touches them, including piercing weapons like Reflector and Pulse Gun. The only real way to counter them is to use Homing Laser or an Ultimate that creates a lot of bullets like Exia.
Type 1
There are 2 different types of B-Eaters. Type 1 will spawn at minutes 5 and 10 in a ring around the character. This can very easily end your run if you aren’t prepared, and is difficult to deal with if you don’t have Homing Laser or its Evolution.
Type 2
Type 2 will spawn at minutes 7 and 11 from every direction; however, less spawn from the top and bottom of the screen, so I highly recommend going up or down to dodge these.
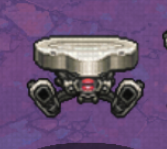
Crystal Chamber MOG 2.0 guide
Finally, we have the cause of many wasted hours and fallen tears: Crystal Chamber himself.
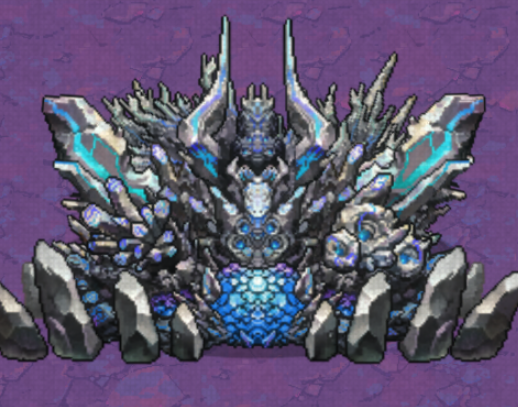
This boss has 3 different phases and 7 different attacks he can do. I am counting different or harder versions of the same attack as one attack.
Before I get to the attacks, we need to get this out of the way. Do not, under any circumstances, touch the boss.
99% of the time, this is instant death, unless you have an insane amount of health or defense. With that out of the way, the boss has 4 attacks in his first phase. I will label these 4 as Shield, Pillar, Center, and Death.
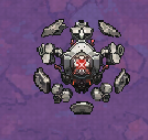
Shield is by far the easiest attack he does; he will summon 10 B-Eaters that will circle him until they are defeated. This attack is pretty simple and nothing to worry about.
Pillar is a huge burst of attacks and a constant stream of bullets that are much faster than you. Right before he does this attack, he’s going to spawn a Pillar. Once you get behind the pillar, this becomes a free attack. The pillar acts as a B-Eater and will destroy all bullets that touch it.
Center is the next in line in terms of difficulty; he will launch crystal bullets from his body in every direction. These will do insane amounts of damage, so you want to forget about attacking and get far enough so that dodging is easier.
Death is the attack that will kill 50% of your runs. Crystal Chamber will put several warning signs around you and then teleport four times. Each time he does this, he will spawn two rings of crystal bullets that have different speeds and are as deadly as Center bullets. This attack is RNG-based and there isn’t any real way to prepare for it. It’s just going to take good reaction time to dodge this one. (Running in any of the diagonals seems to help, but there’s no guarantee.)
At the start of phase 2, Crystal Chamber gains two more attacks that I’m calling H-Form and C-Summon. He will use H-Form at the start of phase 2.
H-Form will spawn two warning signs on himself and then shoot out six lines of crystals, one on each side, two above, and two below.
You want to use this time to get slightly farther away because he will spawn four crystal spirals and repeat these attacks once more after the spirals are done.
C-Summon is a much weaker attack that summons a few L-Crystals around your character. You are still able to kill these, so this attack is really easy and you’ll hardly notice it.
He only gains one new attack in phase 3, but it’s probably his hardest. He will summon like 50 warning signs around you and disappear for a second, then reversed spiral patterns will flood the screen the same as the H-Form spirals, but they are coming from the sides of the screen instead.
To dodge this one, you need to follow in between the spiral lines and switch which spiral you are in when you reach the end of 1. Dealing with this attack just takes practice and luck.
He will also get a stronger version of every other attack mentioned except Pillar and Shield, but most of these just add more bullets and the strategies stay the same; he will repeat these attacks until either you win or he defeats you. (You can still die even when his death animation is playing.)